This is a general/meta post to introduce this idea of a tech “stack” and individual researcher applications development. Eventually I want to get to the idea of a “stack” for the social science research workflow (part 2).
The Stack
The stack. I keep on using this word, and admittedly for the longest time I only had a vague sense what it referred to. Read on so you can use this swanky jargon and sound more like a Silicon Valley startup (and also because it’s a helpful concept).
In IT, the tech stack refers to the collection of tools, parts and technologies that combine to produce some larger application. Let’s start with the example of a simple blogging application, like the one you’re looking at right now.
Functionality
When building an application, I find it helpful to start with functionality: “what do I need this application to do?” From there we can start asking questions about what it needs to be in order to serve this purpose.
Putting aside that we are all familiar with the idea of a blog, let’s start first with my problem and what I need my application to do:
- Problem: I want to be able to share things I write with the general public (i.e. self-publish).
- Functionality: I need an application that:
- Allows me to host documents (with text and multimedia).
- Organise these documents in an easy-to-navigate manner.
- Share these on the web so anyone can access them.
The next step is to put together the tools I have, and know how to use, to accomplish each of these task. I already know a few things off the bat:
- The application needs to be a website. This requires:
- A server to host, execute and serve the code.
- A domain name, DNS records, and public IP.
- Webpages in
html,cssfor styling, and so on.
- I also need a way to update the blog. Preferably:
- A way to create a local version of the blog as a “test” version.
- Tools for editing source files (and transforming them to
html/css/js). - A system for managing and moving versions and updates.
When it comes to choosing the tool for the job, the options are endless! But each comes with its own pros and cons.
For instance, I could do the first two steps with tools provided by AWS:
- AWS Lightsail to host the website.
- These are lightweight webservers that can come pre-installed with standard tools.
- Route 53 for DNS management
But this is a) not free (probably £10 per month roughly) and b) overkill when all I want is a standard blogging application.
The solution I settled on is summarized in the diagram below:
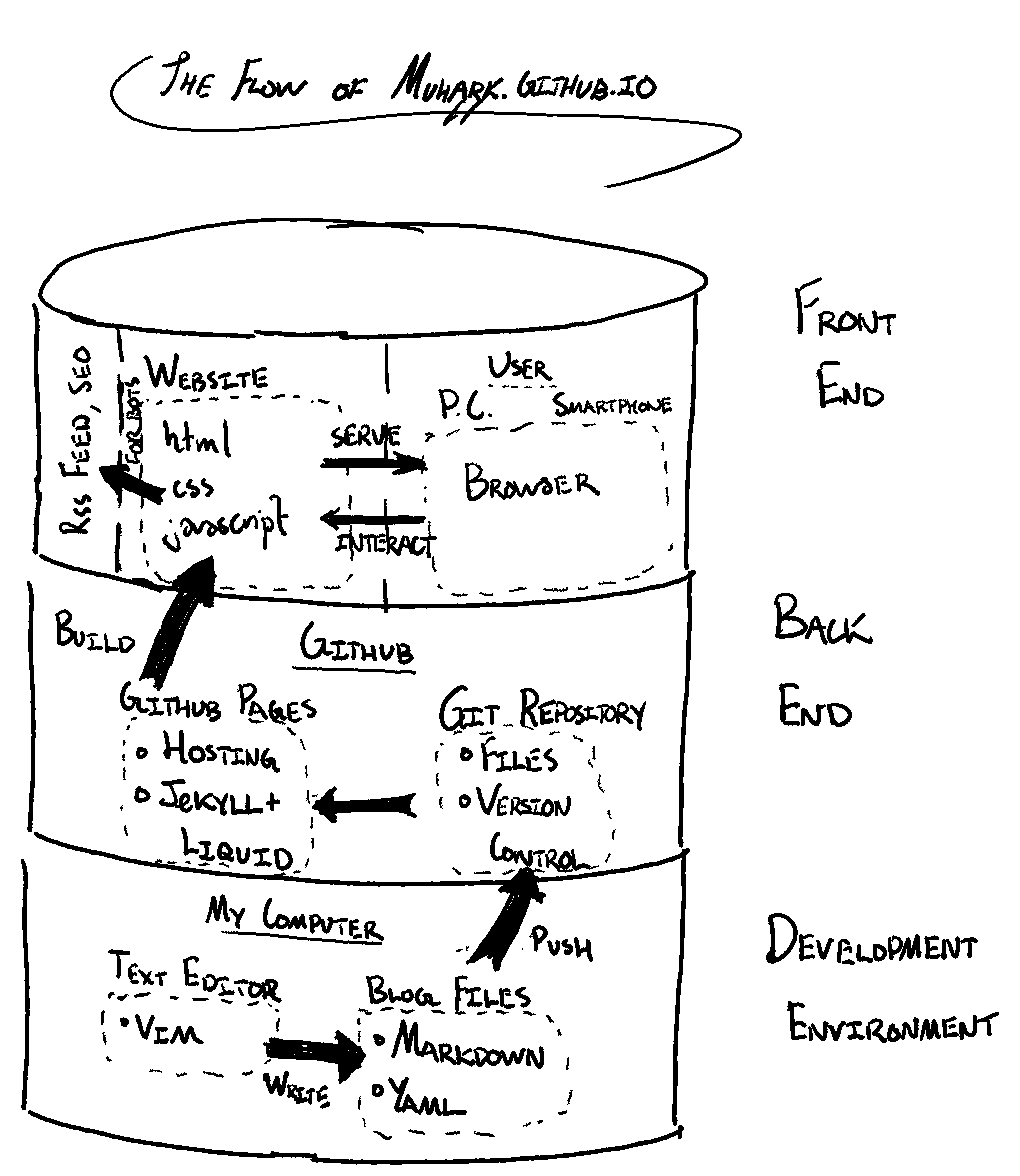
Let’s work through each of these components, and why I’ve grouped them in this way.
Front End
The parts that you can see and interact with—the website, the text, the layout, the links, the colours—are often grouped together under “front end”. The “code” making up the front end of this blog is a combination of html, css, javascript.
We should also include user experience/user interface (UX/UI) in front-end design. You, the user, experience this blog through a specialised piece of software on your phone or computer called a “web browser”. This receives the various code that creates this website, and provides you with a visual interface.
Instead of building the front-end components from the ground-up, I “forked” the source code of another blog that I liked the look of and modified it to suit my use case. For the visual elements, I modified the css files.
Some other design considerations that I made when copying/choosing my front-end components included:
- Mobile-friendly layout: I want my blog to be readable on mobile phones as well.
- Note also the XML Feed to the right. This is an interface for RSS readers and other automated approaches to access this blog.
- Tags (categories) and a separate page for projects/papers.
Back End
I use Github Pages to build, host and serve the webpage from a repository.
- The repository contains the Markdown files and other configurations.
- Github runs a
Rubyapplication called Jekyll on these files:- This uses a combination of text, html, and other code files to generate the pages that make up this website.
- Github also provides the server, the IP address, and the domain name (all for free, I might add).
Note that as the user, you won’t ever see or interact directly with the back-end components (although you can view the source code. There are, in fact, two degrees of separation:
1) Jekyll + Liquid convert Markdown + html templates to html. 2) Your browser reads the source text files, and presents them visually.
On the other hand, I almost exclusively deal with back-end components; I manually write/edit the Markdown and other source (text) files that are turned into the pages of this blog.
Development Environment
The development environment isn’t usually included in a tech stack, but that’s because it’s more specific to the developer than the application. For completeness I’ll include it here, since it may not be a given that my readers already have this workflow.
The first tool is a text editor to produce these source files. Applications like Microsoft Word and RStudio are examples of editors (with a lot of functionality added on). Some excellent and widely-used free editors for writing code include:
I personally use VIM with various add-ons, and the command-line git tool to push a local version of the source files of this blog to Github. I’ll discuss both of these tools in future posts.
Interchangeability
An implicit takeaway here should be that this is not the only solution. I can swap out any of these components:
- Hosting my own website instead of using Github pages. I could still keep the rest of the stack, and automated the build process on my webserver. If I did this I could also use a different version control system, such as Gitlab (or plain git).
- Change my text editor, or markdown flavour.
- etc.
Building an application is a fascinating process of iterating between focusing on the whole forest and individual trees. Many tools exist to help you automated the planting of individual trees, which in turn allows you to focus on creating something that fits together and works nicely. On the other hand, understanding the mechanics of individual components allows for flexibility, customization, and a stronger ability to troubleshoot when things go wrong.
In a future post, I’ll discuss the research workflow as a tech stack, and go over the tools that I use for my projects.